Down Imaging vs Side Imaging vs Live Sonar: What Each Shows You
Why imaging type matters on the water
Modern fish finders do far more than paint a simple arch on the screen. For recreational anglers around Sydney and along the coast, the choice between down imaging, side imaging and live sonar changes how you read structure, bait and target species such as bream, flathead, mulloway, tailor, kingfish and mangrove jack. Each mode uses sound differently, updates at a different pace, and suits a different style of fishing from kayak drift to small-craft trolling.
This guide from Aussie Tackle Box breaks down what you actually see in each view, how to interpret it in Australian conditions, and how to match the technology to rods, reels, soft plastics and terminal tackle already in your kit. We focus on practical setup, not brand hype, so you can decide what belongs on your console or kayak dash.
Down imaging: a sharp slice under the boat
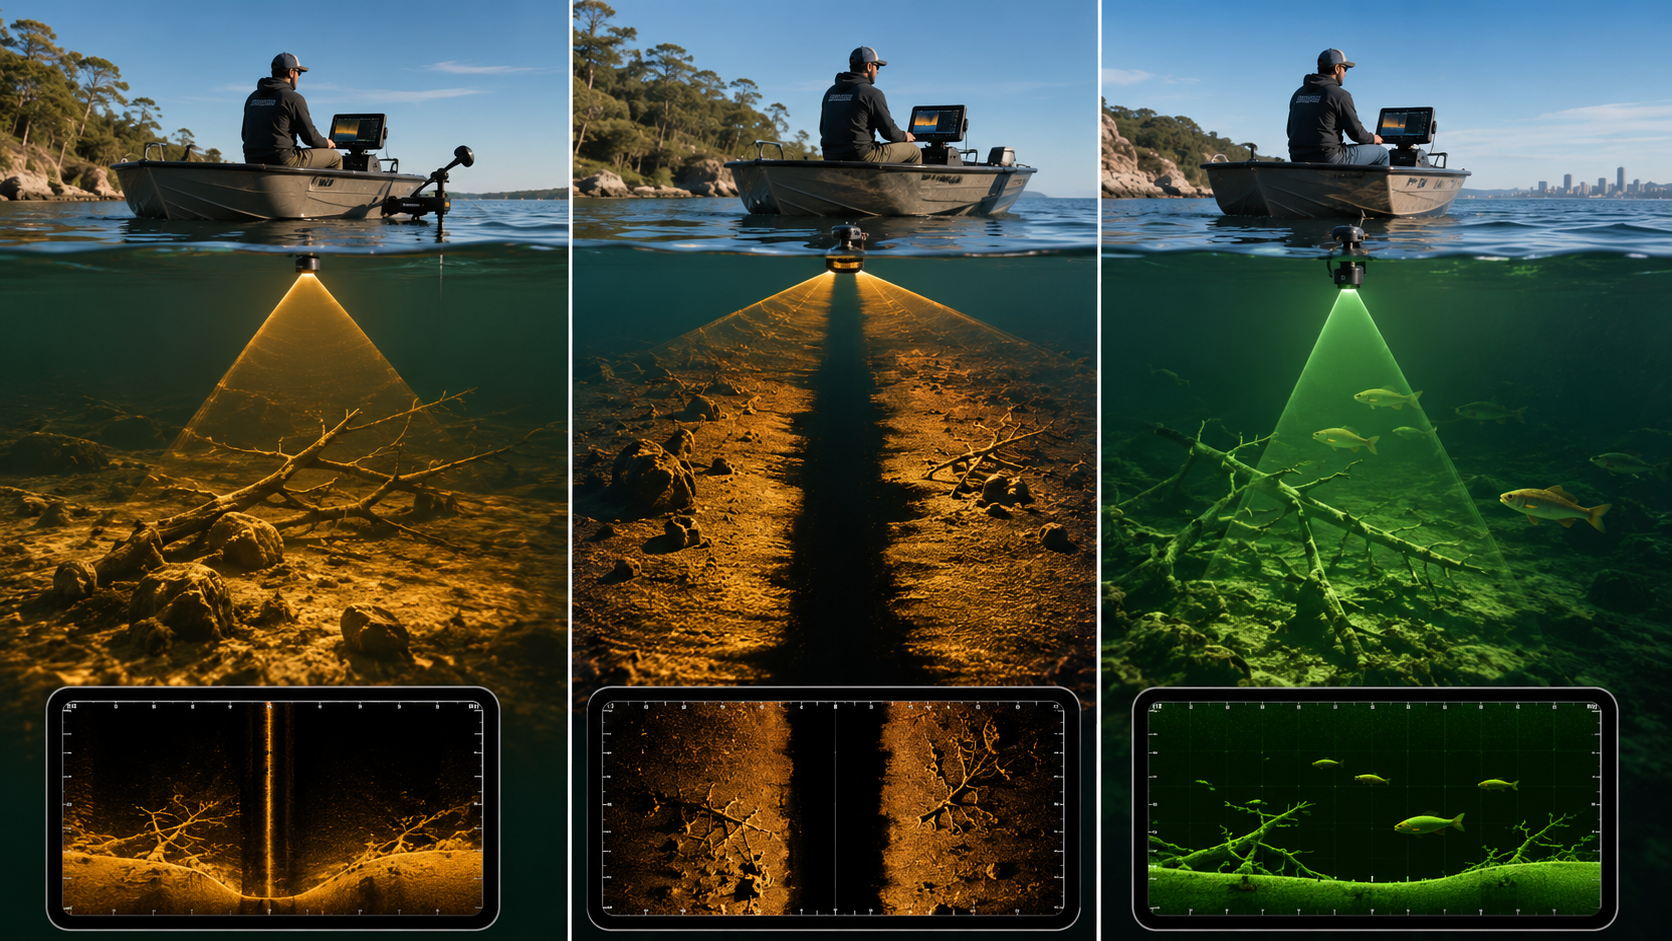
Down imaging (sometimes called downscan) sends a narrow, high-frequency beam straight beneath the transducer. Instead of a wide traditional cone, you get a thin vertical “slice” that resolves hard edges: rock ledges, timber, weed edges, drop-offs and the outline of fish holding tight to cover.
What it shows well:
- Bottom hardness transitions (sand to rock, mud to shell)
- Vertical structure directly under the hull or kayak
- Fish arches or marks stacked on wrecks, pylons and deep holes
- Weed height and clarity of the bottom contour in metres
Down imaging is excellent when you are already over a mark and want detail. In Sydney Harbour, coastal bays and estuary bends, it helps separate a mulloway sulking on a ledge from bait pinned to the same wall. It is less useful for searching wide flats quickly, because the beam only covers what is under you.
Practical down imaging tips
Run a split screen with traditional 2D sonar beside down imaging. Use 2D for depth and motion cues, and down imaging for shape. Keep boat speed low—often under 5–6 km/h—so the picture stays crisp. Set sensitivity high enough to show bait clouds without filling the screen with noise from chop. Mark waypoints when you see a clean ledge or timber snag, then work soft plastics or lightly weighted rigs back through the same vertical column.
Side imaging: wide search left and right
Side imaging fires beams out to port and starboard, building a photo-like mosaic of the bottom beside the boat. Ranges are often set in tens of metres each side, so one pass can map a channel edge, a flat, or a stretch of rocky shoreline without driving over every metre of water.
What it shows well:
- Horizontal layout of banks, drains, wrecks and reef patches
- Schools of bait and gamefish offset from the boat track
- Shadows that reveal height of rocks, trees and man-made structure
- Clean versus cluttered ground before you commit a cast
Side imaging shines for searching. On large estuaries, coastal lakes and inshore grounds, you can idle a line, spot a dark shadow or bait ball off to one side, then turn and investigate with down imaging or a cast. Species such as flathead on sand edges, bream on rock bars and tailor working bait are often found first on the side view, then fished once you know the angle and distance.
Reading side imaging shadows and range
Objects cast acoustic shadows. A tall rock or standing timber leaves a blank streak behind it; the length of that streak hints at height. Keep the range realistic for water clarity and depth—very wide ranges in shallow, cluttered water can look busy and hard to interpret. Straight, steady passes produce the cleanest image; sharp turns warp the mosaic. When you mark a target off to the side, note which side and roughly how many metres, then approach slowly so you do not drive over the fish before the lure lands.
Live sonar: real-time movement in the water column
Live sonar (forward-facing or real-time scanning styles) updates continuously so you see bait and fish moving as it happens. Rather than a historical trail of where the boat has been, you watch the water column or a forward cone and adjust lure depth, retrieve and boat position on the fly.
What it shows well:
- Fish rising, sinking or sliding off a lure
- How high bait is suspended in metres below the surface
- Reaction to soft plastics, metal jigs and slow-rolled swimbaits
- Precise vertical presentations for kingfish, barra in relevant waters, Murray cod in inland systems, and schooled pelagics
Live sonar rewards active angling. You cast, watch the lure fall, and see whether a mark turns, follows or ignores it. That feedback shortens the learning curve on colour, sink rate and cadence. It is especially useful from kayaks and small craft when you can hold position with a light breeze or a shallow anchor and work one school thoroughly.
Limits and good habits with live sonar
Live views are narrower in coverage than a full side-imaging sweep, and they ask more of your attention. Pair them with a conventional map or GPS plot so you still know where you are relative to channels and hazards. Avoid chasing every flicker—learn the difference between bait, debris and the solid returns of larger fish. Keep transducer alignment correct; a slightly twisted mount can point the beam away from your lure and create false blanks.
Choosing modes for common Aussie scenarios
Match the tool to the job rather than leaving every panel on at once.
- Estuary edges and flats for bream and flathead: Side imaging to find drains, weed lines and isolated structure; down imaging to confirm bottom type; light soft plastics once you are in casting range.
- Harbour and coastal structure for mulloway and kingfish: Down imaging and 2D to sit on ledges and bait; live sonar when you want to watch vertical jigs or soft plastics through the school.
- Wide searching for tailor, Spanish mackerel grounds or bait balls: Side imaging and traditional sonar while covering ground; switch to live or down views when you stop to cast.
- Kayak and small-craft fit-outs: A compact unit with quality down imaging covers most needs; add side imaging if you often search big flats; consider live sonar only if you fish vertically and can power and mount it cleanly.
Power draw, mounting space and transducer placement matter as much as screen size. A clean install with the correct cable runs and a transducer free of turbulence will outperform a crowded dash with poor water flow under the housing.
Settings checklist before you leave the ramp
Work through a short routine so the picture is trustworthy when fish show up.
- Confirm units are metric (depth in metres) and local time is correct on the plotter
- Set side-imaging range to match the waterway width you are working
- Balance contrast and noise rejection for wind chop common on exposed Sydney days
- Save a simple split-screen layout: map + down imaging, or 2D + live view
- Check transducer face for weed or growth after trailering
- Update software when you have reliable shore power and time—not at the ramp in a rush
Keep a cloth and basic care kit in the tackle box so salt crystals do not sit on contacts after a session. Rinse gently with fresh water and allow the unit to dry before covers go on.
Linking sonar reads to rigs and safety
Electronics only pay off when they change where and how you present a lure. If side imaging shows a sharp rock bar, step up leader abrasion resistance. If down imaging shows fish hard on the bottom in a deep hole, lengthen pauses on soft plastics or move to a heavier jig head measured in grams. If live sonar shows fish suspended mid-water, count down your lure and keep the retrieve in that band.
Stay aware of other boats, ferry lanes and local fisheries rules while you stare at the screen. Sounder concentration is no excuse for missing a navigation mark or a change in weather. State rules on bag limits, closures and gear still apply regardless of how clear the image is. When in doubt, check the current regulations for the waterway you are fishing before you launch.
Quick comparison summary
Down imaging — best detail directly under the boat; ideal for confirming structure and fish once you are on a mark.
Side imaging — best wide-area search left and right; ideal for finding new banks, wrecks and bait without driving over everything.
Live sonar — best real-time feedback on fish and lure; ideal for vertical or highly interactive presentations when you can hold position.
Many Australian anglers end up using two modes together: side imaging to hunt, down imaging to refine, and live sonar when the bite demands constant adjustment. Start with clear goals for the species and waterways you fish most, then add capability as your small-craft or kayak setup allows. For more gear context across rods, lines and storage that sit beside a sounder on a day out, explore the wider guides on Aussie Tackle Box and build a setup that stays simple enough to use under real conditions.
Questions about fitting marine electronics into a balanced tackle plan for Sydney waters? Contact Aussie Tackle Box on +61275903570 or [email protected] during Mon–Fri: 09:00 – 17:00 (AEST).
Navigation
See also
FAQ