Fish Finder Basics: Frequency, Cone Angle, CHIRP and Power Explained
Why sonar settings matter on Aussie water
A fish finder is only as useful as the way you set it up. On Sydney harbour walls, estuary flats and coastal reefs, the same unit can look sharp or muddy depending on frequency, cone angle, CHIRP range and transmit power. Aussie Tackle Box put this guide together so recreational anglers can match sonar choices to real sessions chasing bream, flathead, mulloway, tailor, kingfish and other local targets—without drowning in brochure jargon.
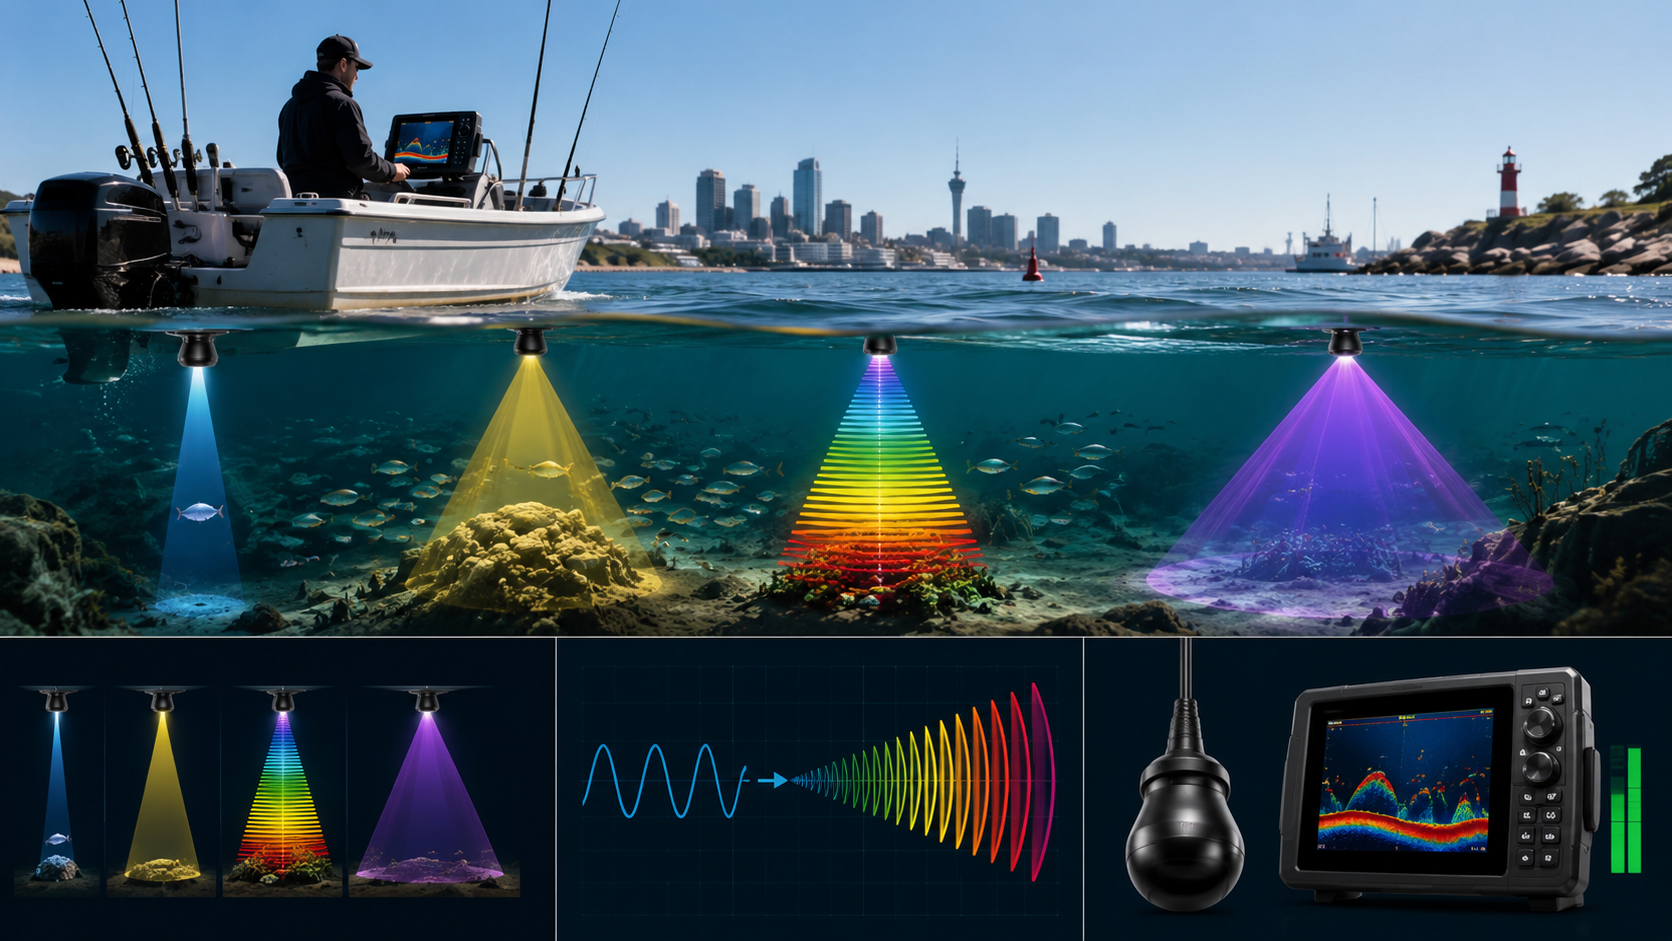
Think of sonar as a torch beam under the boat. Frequency changes how fine the detail is and how deep the beam reaches. Cone angle changes how wide that beam is. CHIRP sweeps a band of frequencies instead of one fixed tone. Power affects how hard the signal pushes through water, weeds and soft bottom. Get those four right and you spend less time guessing and more time fishing.
Frequency: detail versus depth
Traditional single-frequency sounders commonly offer options around 50 kHz, 83 kHz and 200 kHz. Lower frequencies travel farther and suit deeper coastal or offshore work. Higher frequencies give tighter detail in shallower water—ideal for estuary edges, rock walls and boat harbours where you are marking bait schools, drop-offs and individual fish in a few metres to a few dozen metres.
- High frequency (around 200 kHz and up): sharper separation of fish arches and structure in skinny water; great for bream and flathead over mud and weed, or kingfish holding on harbour markers.
- Mid frequency (around 83 kHz): a practical all-rounder for mixed depths on many small craft.
- Low frequency (around 50 kHz): wider coverage and better depth performance when you push farther out or work deeper ledges for mulloway and larger pelagics.
Many modern transducers also support very high frequencies for DownScan or SideScan-style imaging. Those modes excel at showing snags, oyster racks and wreck outline, but they are not a full replacement for traditional 2D sonar when you want classic fish arches and depth performance.
Cone angle: how much bottom you paint
Cone angle describes the width of the sonar beam. A narrow cone concentrates energy and helps separate targets under the boat. A wide cone covers more ground each pass, which is handy when you are scanning flats or searching for bait before you slow down.
In practical terms:
- Narrow cones help when you are vertical jigging, holding on a mark, or trying to decide whether returns are one solid fish or a tight ball of bait.
- Wider cones help when you are idling across a bay looking for tailor bust-ups, bait clouds or the soft edges flathead favour.
Remember depth changes the footprint. The same cone covers a small circle in 3 m and a much larger circle in 30 m. In shallow estuary work a wide beam can light up half the channel; in deeper water that same angle still misses fish outside the cone, so slow S-turns and multiple passes matter more than any single setting.
CHIRP: clearer marks with less clutter
CHIRP (Compressed High-Intensity Radiated Pulse) sends a sweep across a range of frequencies rather than one fixed ping. The sounder then processes the return for better target separation and often a cleaner picture at speed. For kayak and small-boat anglers around Sydney, CHIRP is especially useful when you want to split bait from predators or see fish holding tight to structure without the screen turning into a mess of noise.
When you set up CHIRP:
- Pick a CHIRP band that matches your depth—higher bands for skinny water detail, lower bands when you need reach.
- Start with the maker’s default sensitivity, then ease gain down until clutter drops but fish and bottom remain solid.
- Compare CHIRP 2D against any imaging view you have; use imaging to understand shape, and CHIRP 2D to track fish under the transducer while you present a lure or bait.
CHIRP will not invent fish that are not there. It will help you trust what you see when the water is stained after rain, when chop puts air bubbles under the hull, or when you are working a steep rock face where traditional fixed-frequency returns can smear together.
Power: watts on the box versus results in the water
Transmit power is usually quoted in watts RMS. More power can help in deeper water, over soft muddy bottoms, or when you need a stronger return through weed. For many estuary and inshore sessions, a well-mounted transducer and sensible gain beat raw wattage. A high-power unit poorly installed on a hull full of turbulence will still paint a noisy screen.
Practical power tips for recreational setups:
- Match the transducer to the sounder—mismatched power and element designs waste performance.
- Keep the transducer face clean of growth; even a thin film dulls returns more than most anglers expect.
- Check cable runs away from noisy electrical gear on small craft and kayaks.
- Use enough power for the depth you actually fish; endless maximum power in 2 m of water often adds clutter, not clarity.
If you trailer a tinnie or paddle a kayak, mounting height, angle and freedom from aerated water matter as much as the number printed on the carton. Test at the speeds you really fish—slow drift, light troll and idle search—not only at the ramp.
Reading the screen for local species
Settings only pay off when you link them to behaviour. Bream and flathead often show as tighter marks near bottom or along weed edges. Mulloway may sit harder on deeper holes, bridge pylons and tide lines. Tailor and kingfish frequently relate to bait balls mid-water. Adjust frequency and zoom windows so the water column you care about fills the display, then watch how marks move when you change lure depth or drift line.
A simple on-water routine:
- Set depth range manually so bottom sits in the lower third of the screen rather than auto-jumping.
- Tune sensitivity until the bottom is bold and scattered bait appears without filling the whole pane with speckles.
- Use a narrow colour line or similar bottom-lock aid if your unit offers one, so soft mud versus harder ground is obvious.
- Mark waypoints on consistent structure—not every single blip—so you can return on the right stage of the tide.
Small-craft and kayak fit-out notes
Kayak and small-boat electronics need stable power, a transducer that stays wet and clear of paddle or prop wash, and a screen you can read in harsh Australian sun. Keep mounts low and secure, protect plugs from spray, and practise changing presets before you leave the ramp. Store a simple written cheat sheet in the tackle box: shallow estuary preset, deeper harbour preset, and a high-noise preset for choppy afternoons.
Pair sonar with sensible terminal tackle and lure choices for the species and depth you are marking. A clear arch under the boat means little if your soft plastic is riding too high or your metal is ripping above the school. Use the sounder to shorten the loop between seeing fish and presenting in the right zone.
Safety, rules and realistic expectations
Marine electronics help you navigate and fish more efficiently, but they do not replace surface watch, lifejackets, or local knowledge of bars, shipping lanes and weather. Check current fisheries rules for your state and waters before you keep fish, and treat sonar marks as information—not a guarantee of a hook-up. Conditions change with wind, tide and season across the southern hemisphere calendar, so revisit your presets when summer surface haze, autumn bait runs or winter hole-fishing change how the water column looks.
If you need a hand matching a sounder style to your boat or kayak layout in the Sydney area, contact Aussie Tackle Box on +61275903570 or [email protected] during Mon–Fri: 09:00 – 17:00 (AEST). Bring notes on hull type, typical depths and target species so the conversation stays practical.
Quick setup checklist before you leave the ramp
- Correct frequency or CHIRP band for expected depth.
- Cone and view choice matched to search versus vertical work.
- Power and gain balanced for clean bottom and visible bait.
- Transducer clean, aligned and free of air bubbles at fishing speed.
- Waypoints and tracks backed up; screen brightness readable in full sun.
- Safety kit packed and local regulations reviewed for the waters you will fish.
Master frequency, cone angle, CHIRP and power in plain language and your fish finder becomes a fishing tool, not a confusing gadget. Start with defaults, change one setting at a time, and let real sessions on local water teach you which picture helps you catch more flathead on the drift, pin bait for mulloway, or stay on a moving kingfish school. That steady, methodical approach is the core of getting value from marine electronics on Australian recreational boats and kayaks.

Navigation
See also
FAQ