Portable and Castable Sonar for Kayaks, Land-Based and Hire Boats
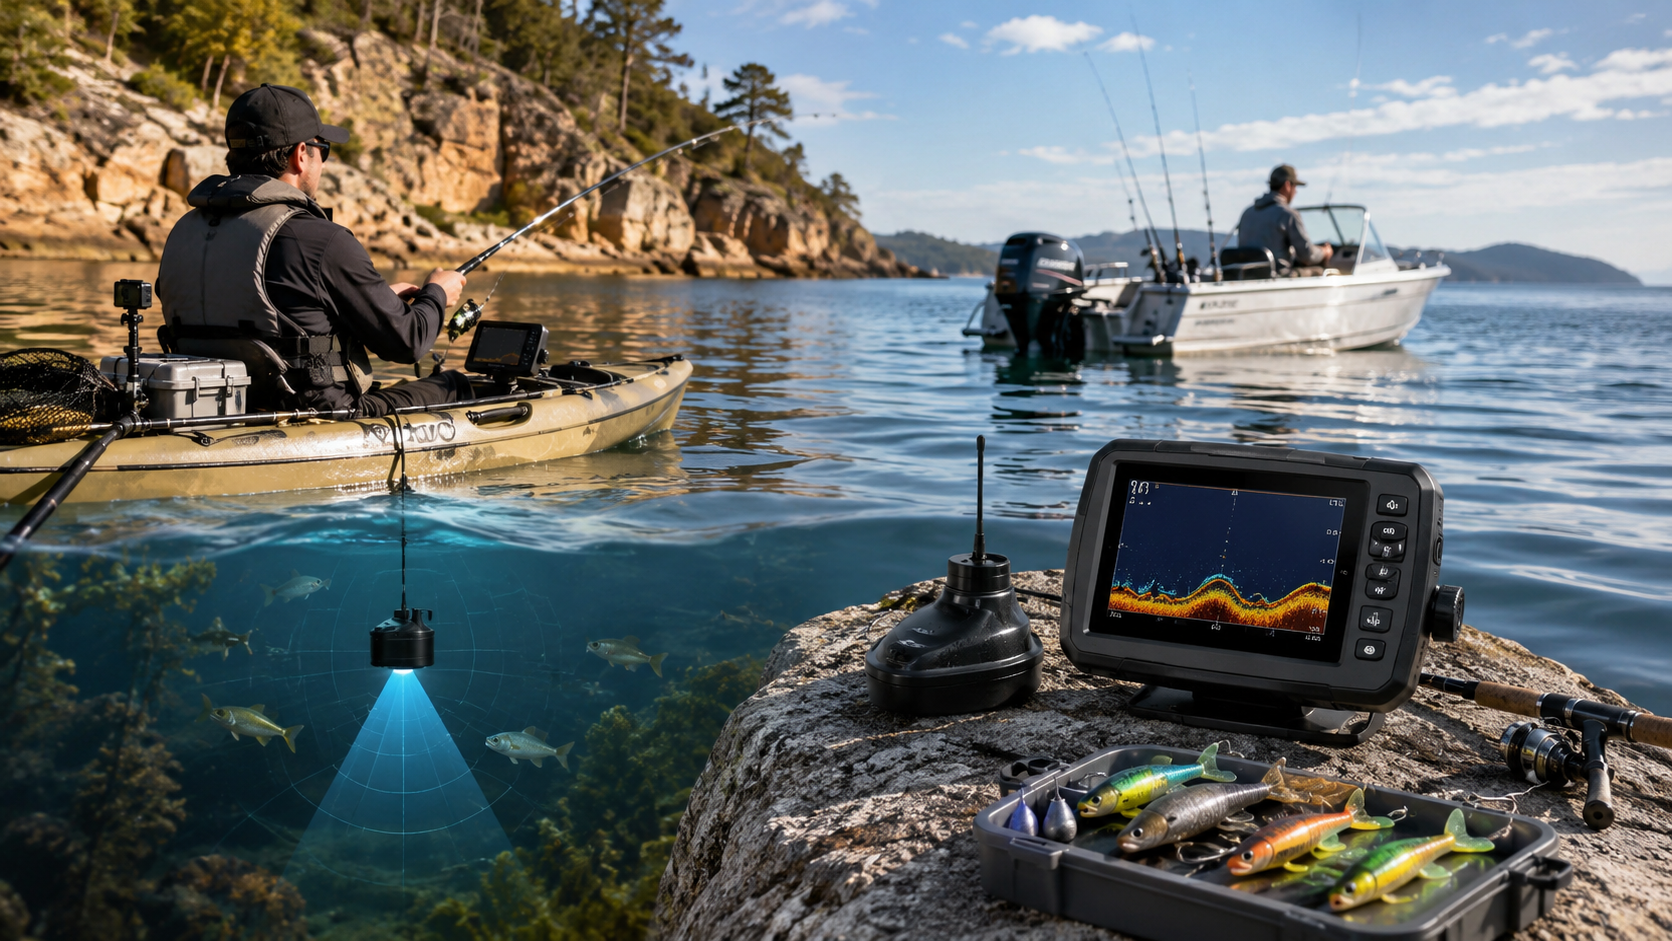
Why portable sonar suits Australian small-craft and shore sessions
Many Sydney anglers fish from sit-on kayaks, hired tinnies or rock platforms where a fixed through-hull transducer is not an option. Portable and castable sonar lets you map depth, bait and hard structure without drilling a hull or relying on a permanent power system. Used well, it shortens the time spent blind-casting over empty sand and helps you place soft plastics, vibes and bait rigs where bream, flathead, mulloway, tailor, kingfish and mangrove jack actually hold.
Aussie Tackle Box focuses on recreational setups that pack light, run on simple batteries and still give clear enough returns to fish confidently in harbours, coastal lakes and nearshore grounds around Sydney. This article covers unit types, mounting and casting methods, reading the screen, species-focused use and basic care so your kit survives salt, sand and hire-boat turnarounds.
Unit types: portable transducers versus castable pucks
Two broad families dominate the portable market.
- Portable display plus suction or clamp transducer. A compact head unit pairs with a transducer on a suction cup, transom clamp, scupper mount or temporary arm. Best when you have a deck edge, kayak hull side or tinnie gunwale and want continuous scanning while you drift or paddle.
- Castable wireless sonar. A small floating puck casts on braid or mono, pairs to a phone or dedicated handset and returns depth and arches while you retrieve or leave it sitting over a hole. Ideal for land-based walls, rock ledges, estuary banks and hire boats where you cannot attach hardware.
Choose portable clamp or suction kits when you control the craft for a full session. Choose castable pucks when access changes every trip—different hire boats, shared rock platforms or walk-in flats where weight and setup speed matter more than a large screen.
Power, range and what “portable” really means on the water
Portable head units usually run from internal rechargeable packs or a small 12 V sealed battery in a dry bag. Castable pucks are self-powered and talk over wireless for a limited distance—enough for casting from a kayak or shore, not for long-range offshore work. Plan around realistic battery life for a dawn-to-late-morning session in cooler southern months and shorter mid-morning windows in summer heat.
Keep spare charge capacity in a dry pouch. Label cables so you can rebuild a hire-boat mount in minutes. Avoid dangling power leads near paddle strokes, anchor rope or landing nets. Metric depth readouts in metres keep your notes consistent with local charts and tide apps used around Sydney.
Kayak mounting that stays quiet and secure
On a kayak, transducer placement decides whether you see fish or only turbulence.
- Place a suction or scupper-style mount where the face sits fully wet, away from kick-up from the hull and clear of rudder or drive hardware.
- Aim the beam slightly forward of vertical if you track while paddling, then level it when you stop to work a bank.
- Route the cable under deck elastics so it cannot snag a rod butt or lifejacket buckle.
- Use a short arm or rail mount only if it does not raise the centre of gravity or foul your paddle arc.
Test the mount in calm water before a windy harbour run. A unit that peels off mid-session is worse than no sonar at all. After salt use, rinse the cup face and cable glands in fresh water and dry before packing.
Hire tinnies and borrowed small craft
Hire boats rarely allow permanent installs. A portable kit with a clamp or strong suction mount and a self-contained battery is the practical path. Arrive with the head unit charged, the transducer cleaned and a simple checklist:
- Confirm a clean, flat mounting surface above the waterline path of the prop wash.
- Clamp or suck on, then gently tug-test before leaving the ramp.
- Set depth scale in metres, adjust sensitivity until the bottom paints solid without filling the water column with noise.
- Mark productive edges mentally or with a simple waypoint habit if your unit allows temporary marks—drop-offs, weed lines and bridge shadow lines.
- On return, remove every clamp mark, wipe salt, and pack leads so the next hirer is not left with loose hardware.
Never drill, screw or adhesive-bond anything to a hire hull. Keep the whole system reversible in under a few minutes.
Land-based and castable technique
From walls, rock platforms and estuary banks, castable sonar shines when you treat it like a slow lure rather than a fixed sounder.
- Cast beyond the likely holding water, let the puck settle, then watch depth and returns as you ease it back through the zone.
- Park the puck up-current of a hole or gutter and fish past it with a second rod so you are not retrieving through your own line constantly.
- On stepped rock ledges, map depth changes in metres before you commit heavy sinkers or expensive soft plastics to snaggy ground.
- Mind surge and wash—retrieve early if swell lifts the puck onto dry rock.
Pair the cast with light braid for distance and a short tough leader so abrasion on oyster or sandstone does not cut you off. Keep the handset or phone in a waterproof pouch with a lanyard; wet fingers and bright Australian glare make cheap mounts fail at the worst moment.
Reading structure for local species
Sonar is only useful if you translate blobs into fishing decisions. Around Sydney and similar temperate waters, think in habitats:
- Flathead – soft edges where sand meets low weed or drop-offs; look for gentle depth changes rather than dramatic wrecks.
- Bream – tight to rock walls, pontoon shade and oyster lines; small arches hard against vertical returns matter more than mid-water bait balls.
- Mulloway – deeper holes, bridge pylons and tide-swept gutters; watch for larger arches holding near the bottom change on the turn of the tide.
- Tailor and kingfish – bait schools and pressure points near headlands or harbour structure; faster-moving marks higher in the column can signal a surface or mid-water bite.
- Barra, murray cod, mangrove jack and spanish mackerel – when you travel, the same portable habits apply to timber, rock bars and current seams; adjust expectations to local depth and snag density rather than forcing a harbour preset.
Start with a conservative sensitivity so the bottom is a clean line. Increase gain until bait sparkles appear without turning the whole column grey. If clutter explodes in chop, lower chart speed slightly and keep the transducer wet and stable.
Pairing sonar with rods, lines and terminal tackle
Once you mark a ledge or bait edge, match the presentation:
- Soft plastics on light spin outfits for bream and flathead along the first metre or two above the bottom return.
- Vibes and metal slices when bait is suspended and tailor or kingfish show above the mark.
- Heavier soft plastics or bait rigs when mulloway hold in deeper holes—use enough lead to stay vertical without constantly snagging.
- Quality leaders and abrasion-resistant terminal tackle wherever sandstone, oyster or timber paints as hard return.
Keep a simple notebook habit: depth in metres, tide stage, lure weight and species. Over a season those notes beat memory when the same hire boat or rock ledge comes up again.
Safety, etiquette and fisheries awareness
Portable electronics do not replace seamanship. Wear a lifejacket on kayaks and small craft, carry a charged phone in a dry case and tell someone your plan. On rock platforms, never chase a puck into wash zones. Give other anglers space—do not cast a wireless unit through someone else’s berley trail or under a crowded wall.
Check current state fisheries rules for bag limits, size limits and any sanctuary zones before you fish. Sonar helps you find fish; it does not change what you are allowed to keep. When in doubt, consult the official state sources for the waters you are fishing and keep measuring tools handy.
Care, storage and trip packing
Salt crystals kill contacts. After every salt session rinse transducers, pucks and clamps in fresh water, dry thoroughly and store loosely coiled cables without sharp bends. Charge batteries before storage and again the night before a trip. Pack silica gel in the electronics pouch if you leave gear in a hot car boot.
A compact dry box with head unit or handset, transducer or puck, spare mount, cable ties, microfibre cloth and a small power bank covers most Sydney day trips. Add a spare rod leash and a simple first-aid bit for hooks when you fish remote banks.
Building a simple progression
If you are new to portable sonar, start on a calm estuary flat or sheltered harbour arm. Learn what a clean sand bottom looks like, then find a known drop-off and watch how bait and fish marks differ. Only then take the same kit onto a windier hire tinnie or a surge-prone ledge. Consistency of mount, sensitivity and note-taking matters more than chasing every feature on the menu.
For broader gear planning across rods, reels, lines and storage that travel with these electronics, explore the rest of Aussie Tackle Box and reach the team on +61275903570 or [email protected] during Mon–Fri: 09:00 – 17:00 (AEST). Practical portable sonar will not catch fish alone—but used with sound casting angles, metric depth awareness and respect for local conditions, it turns more blank drifts into informed sessions on the water.
Navigation
See also
FAQ