Transducer Types and Mounting: Transom, Thru-Hull and Kayak Scupper
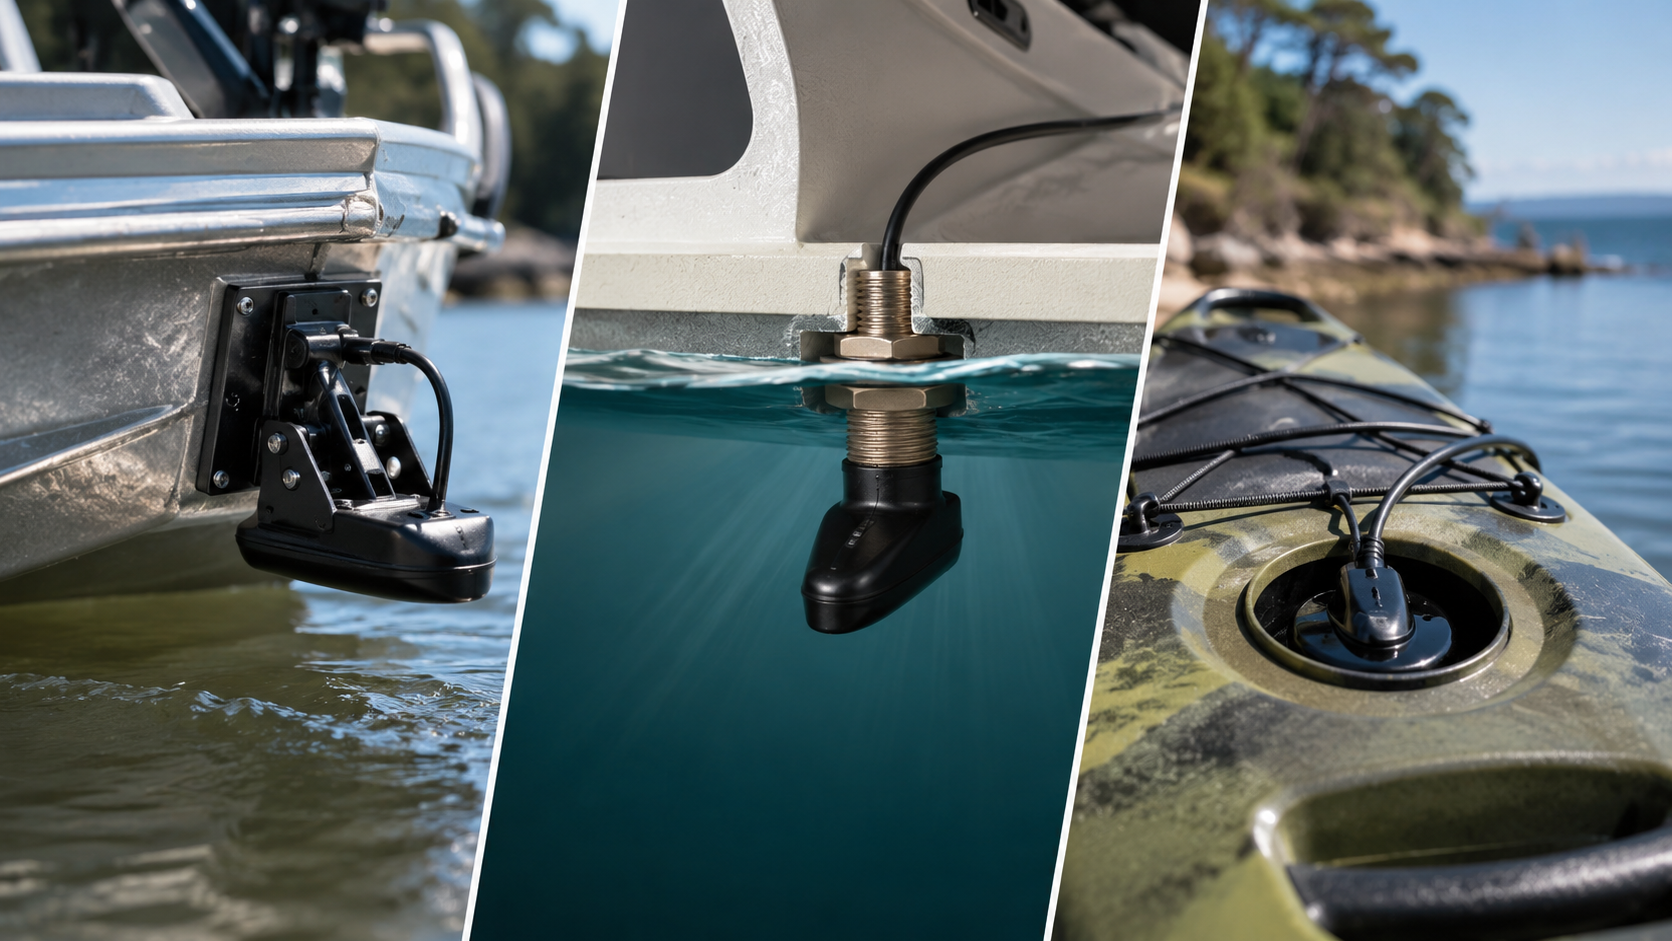
Why transducer choice matters on Aussie small craft
On Sydney Harbour, the Georges River and coastal lakes, a clear sonar picture is what separates a guess from a plan. Whether you are marking flathead on sand edges, tracking bait schools for tailor, or holding depth for mulloway after dark, the transducer is the bit that actually talks to the water. Mount it poorly and even a capable sounder will show noise, double echoes or blank screens when you need them most. This guide walks through the main mount styles used on recreational boats and kayaks in Australian conditions, with concrete steps you can apply on a weekend fit-out.
Aussie Tackle Box puts practical gear guidance first: rods, reels, lines and the electronics that help you use them. Phone +61275903570, email [email protected], or visit during Mon–Fri: 09:00 – 17:00 (AEST) if you want local pointers for Sydney waters. The focus here is mounting geometry, cable runs and species-minded setup—not brand hype.
Transom-mount transducers
Transom mounts are the default on many tinnies and trailer boats under about 6 m. The housing sits on the outside of the transom, usually on the downhill side of the prop wash so the face stays in clean water at planing speed.
When a transom mount suits you
- Aluminium runabouts and punts where you do not want to drill the hull bottom.
- Boats that live on a trailer and dry out between trips—easy inspection and antifoul touch-ups.
- Mixed estuary work for bream, flathead and mangrove jack where you idle, drift and occasionally plane between spots.
Mounting steps that reduce turbulence
- With the boat level on the trailer, mark a vertical centreline clear of strakes, trim tabs and the outboard’s cavitation plate shadow.
- Set the transducer face so its bottom edge is roughly flush with the hull bottom, then fine-tune after a short sea trial—too high sucks air; too low adds drag and spray.
- Angle the face a few degrees nose-down so water flow stays attached when you accelerate.
- Use stainless fasteners with sealant suited to aluminium or fibreglass, and isolate dissimilar metals to limit corrosion in salt.
- Route the cable up and inboard with drip loops, away from bilge water and outboard looms that can induce interference.
After launch, idle in a known depth, then step up speed while watching the bottom trace. If the image breaks up above a certain pace, lower the mount a few millimetres or shift it sideways out of prop wash and retest. Keep a spare set of bracket screws in the tackle box; vibration loosens fittings over a season of ramp launches.
Thru-hull transducers
Thru-hull units pass through the hull skin so the face sits in solid water even when the boat is heeled or running in chop. They suit displacement cruisers, larger trailer boats and anyone who wants maximum high-speed bottom lock for offshore kingfish, spanish mackerel or deeper reef edges.
Fairing blocks, deadrise and material choice
Most planing hulls need a fairing block so the transducer face sits level to the waterline rather than tilted by deadrise. Measure deadrise at the chosen station, cut or order the fairing to match, and bed everything with a marine sealant rated for below-waterline use. Plastic housings are common on smaller craft; bronze is typical where strength and longevity matter, but must be isolated correctly on aluminium hulls.
- Pick a location forward of prop wash, clear of keels, water intakes and bilge keels that shed bubbles.
- Stay inboard of trailer bunks and rollers so the housing is not crushed on every retrieve.
- Allow internal space for the nut, washer and a service loop of cable above the bilge waterline.
Thru-hull work is semi-permanent. If you are unsure about structural members or foam-filled compartments, get a qualified marine tech to confirm the hole location before you cut. Once fitted, inspect the seal at every antifoul and after any hard grounding—Sydney sandstone bars and oyster leases are unforgiving.
Kayak scupper and hull-mount options
Sit-on-top kayaks dominate land-based-to-paddle access around Sydney’s rivers and coastal lakes. Many paddlers shoot a transducer down a scupper hole; others use arm mounts, through-hull kayak fittings or glue-in pockets in the hull recess.
Scupper deployment done properly
- Choose a scupper that stays wet when you are seated and loaded with tackle—usually a mid-hull position rather than a high stern drain.
- Use a dedicated scupper transducer or a compact housing on a short shaft so the face sits below the hull skin without dangling into rocks when you beach.
- Add a simple retention cord or clip so a snag does not take the whole cable and head unit with it.
- Seal cable entries into the hatch area so spray does not fill electronics compartments in winter southerlies.
Arm mounts and glue-in bases
Side-arm or rail mounts let you flip the transducer up for shallows, oyster racks and rocky launches chasing mangrove jack or barra in warmer months up the coast. Spring-loaded arms should park the face parallel to the surface at paddling speed. Glue-in or bolt-through kayak transducers keep drag low for long sessions marking flatties on drop-offs; follow the hull maker’s guidance on laminate thickness and reinforcement plates.
Power management matters on a kayak. Pair the sounder with a dedicated lithium pack sized in amp-hours for your trip length, mount the display where glare from summer sun is manageable, and keep spare batteries in a dry bag. For night mulloway sessions, dim the screen and use a low-lumen headlamp so you still see rod tip and leader.
Matching sonar habits to local species
Mount quality shows up differently depending on how you fish:
- Bream and flathead — slow drifts over weed edges and sand tongues; you need clean detail at idle and pole speed more than high-speed lock.
- Mulloway and jewfish haunts — bridges, tide lines and deeper holes; stable depth and bait arches at rest matter, so avoid mounts that ventilate when the hull rocks.
- Tailor and kingfish — faster runs between bombies and headlands; transom alignment out of prop wash, or a true thru-hull, keeps the bottom trace alive.
- Murray cod and impoundment work inland — steep banks and timber; side-facing or quality 2D detail helps, but only if the transducer face is level and bubble-free.
Soft plastics, lightly weighted rigs and metal slugs all benefit from knowing whether you are above bait or barren ground. Set cone angles and frequency ranges per your sounder manual, then trust the mount to feed clean data before you chase menu tweaks.
Cables, interference and gear care
Pinched cables under hatches are a common failure on tinnies and kayaks alike. Support long runs every 300–400 mm, keep transducer leads separated from bilge pump and electric motor cables where practical, and use dielectric grease on connections that see salt air. After each salt trip, rinse the housing face with fresh water—do not lever barnacles off with a knife blade that can scar the face. In southern waters, winter cold fronts and summer northerlies both throw chop; check bracket bolts after rough days.
Store spare transducers and brackets dry. If you trailer often, confirm road vibration has not walked the transom bracket down. For scupper rigs, remove or raise the unit before cartopping so it is not crushed against racks.
Safety, rules and sensible expectations
Electronics help you fish; they do not replace buoyancy, a kill switch lanyard, lights after dark or a waterproof way to call for help. Check state fisheries apps and signage for bag limits, closures and marine park zones before you launch from Sydney ramps or rock platforms. Sounder marks are not a licence to fish closed water or undersize fish—know your bream, flathead, mulloway and tailor size rules for the waterway you are on.
Mounting a transducer involves drilling, sealing and sometimes working under a hull on stands. Use jack stands rated for the boat, eye protection, and never rely on a bumper jack alone. If the job needs a clean thru-hull on a complex hull, budget for professional help rather than risking a slow leak under the floor.
Quick comparison before you buy brackets
- Transom — fastest DIY path, easy service, speed-sensitive to prop wash; ideal for many estuary tinnies.
- Thru-hull — best water coupling underway and at rest heel; permanent hole and careful fairing required.
- Kayak scupper / arm — portable and paddle-craft friendly; watch snags, beachings and battery life.
Pick the style that matches how you launch, how fast you travel between marks, and how often you can inspect the gear. A tidy cable, a level face and clean water over the transducer will do more for your screen than another unopened pack of soft plastics. For more small-craft fit-out ideas around rods, storage and marine electronics, stay with Aussie Tackle Box and build a setup that suits real Australian seasons—from cool winter jew sessions to warm-weather surface bites.

Navigation
See also
FAQ